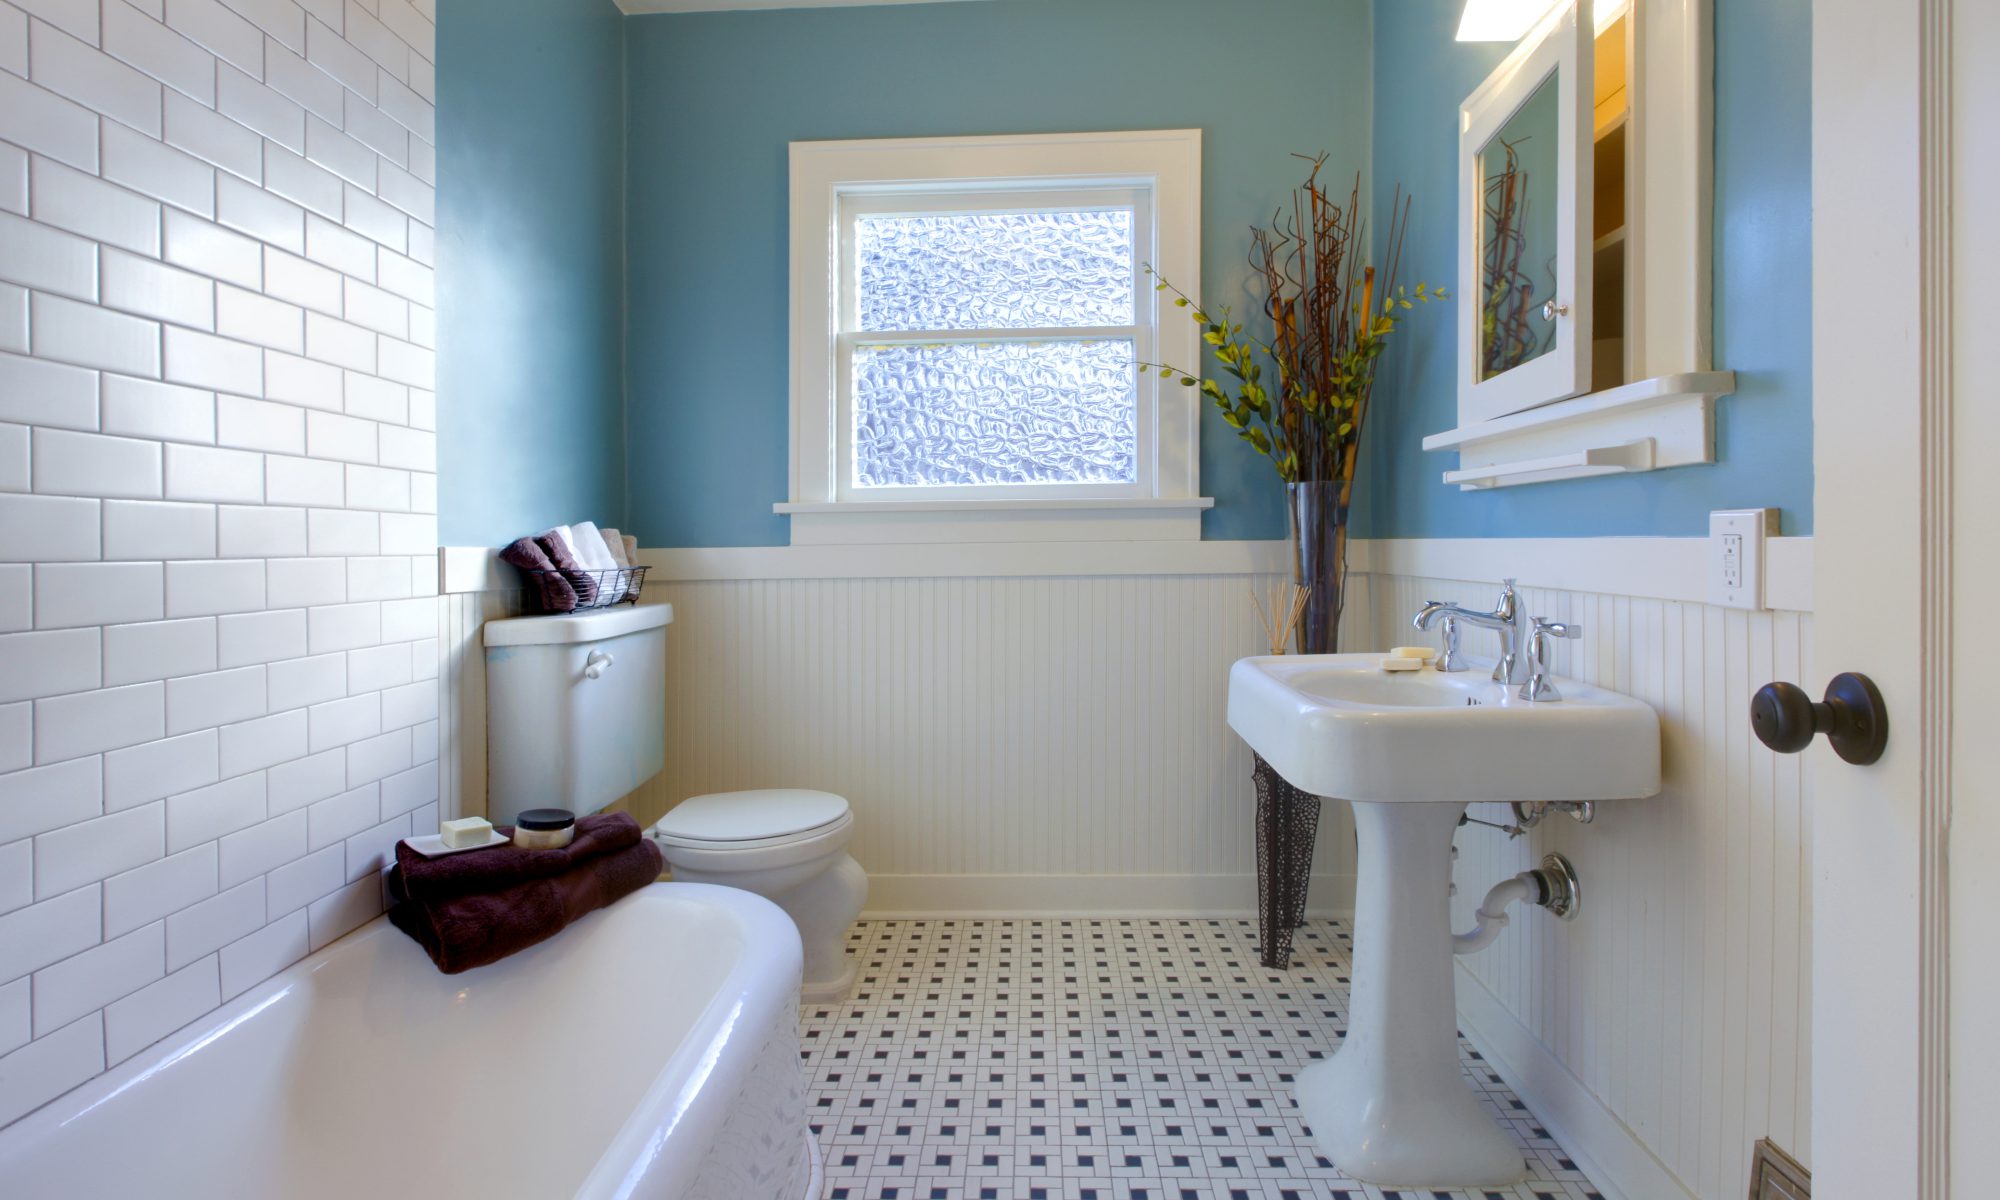
Siding contractors near me in Naperville

window replacement near me Rockford


When severe weather hits, your home’s siding often faces the most damage. Knowing how to protect it and what to do if it gets damaged is crucial for every homeowner. This post offers valuable insights from professional siding contractors on safeguarding your siding and effectively handling repairs after a storm.

Preventing Storm Damage to Your Siding

Proactive steps can minimize the risk of damage to your siding. Here’s what siding contractors recommend:

  1. Choose Weather-Resistant Materials Invest in siding that can withstand harsh weather. Materials like fiber cement, engineered wood, or insulated vinyl are highly recommended by siding contractors for their durability.
  2. Secure All Siding Panels Regular inspections can reveal loose or damaged panels. Ensure all siding is firmly attached to prevent wind from ripping panels off your home.
  3. Maintain Surrounding Vegetation Trim trees and shrubs near your home. Overhanging branches can cause significant siding damage during storms.
  4. Keep Gutters in Good Condition Functional gutters prevent water overflow that can damage your siding. Regular cleaning and maintenance are essential.
  5. Add Protective Installations Installing storm shutters or impact-resistant barriers can protect your siding from flying debris.

Actions to Take If Your Siding Is Damaged

Should your siding sustain storm damage, siding contractors advise the following steps:

  1. Evaluate and Document the Damage Inspect your home thoroughly and take detailed photographs of any damage for insurance purposes.
  2. Notify Your Insurance Company Contact your insurer promptly to start the claims process, providing all necessary documentation.
  3. Consult with Professional Siding Contractors Professional repairs ensure your siding is restored correctly, preventing future issues.
  4. Consider Material Upgrades Use this opportunity to upgrade to more resilient siding materials, enhancing your home’s protection.
  5. Implement Routine Maintenance Schedule regular check-ups with siding contractors to maintain your siding’s condition and catch potential problems early.

Preparation and swift action are key in protecting your siding from storm damage. By following these guidelines and collaborating with expert siding contractors, you can ensure your home’s exterior remains robust against severe weather. Contact reputable siding contractors near me in Naperville in your locality for professional support in keeping your home safe and secure.

Carpet cleaning near me in Elmhurst


Carpets contribute significantly to the comfort and aesthetic of your home, but they also act as filters for dust, allergens, and dirt introduced through foot traffic, pets, and environmental factors. Regular carpet cleaning is essential not only to keep your carpets looking their best but also to ensure a healthy living space. But how often should you schedule professional carpet cleaning? The answer varies based on several household factors such as pets, allergies, and foot traffic. Let’s explore these elements to help determine the optimal carpet cleaning near me in Elmhurst frequency for your home.

Basic Recommendations

Most carpet manufacturers and cleaning professionals advise having your carpets professionally cleaned at least once a year. This interval helps remove the buildup of dirt and allergens that regular vacuuming cannot eliminate. However, this is a broad guideline, and specific household conditions may require more frequent cleanings.

Key Influences on Cleaning Frequency

  1. Pets in the Home

    Pets add joy to our lives but also contribute to carpet dirt and allergens.

  2. Shedding and Dander: Pets shed fur and skin cells that accumulate in carpet fibers.
  3. Accidents and Odors: Pets may have occasional accidents or leave natural odors in carpets.
  4. Suggested Cleaning Schedule:
  5. With Pets: Every 6 to 9 months.
  6. Multiple Pets or High-Shedding Breeds: Every 3 to 6 months.
  7. Allergies and Respiratory Issues

    If someone in your household has allergies, asthma, or other respiratory conditions, cleaner carpets can significantly improve indoor air quality.

  8. Allergen Accumulation: Dust mites, pollen, and pet dander can get trapped in carpets.
  9. Suggested Cleaning Schedule:
  10. Allergy Sufferers: Every 3 to 6 months.
  11. Severe Allergies or Sensitivities: Every 2 to 3 months.
  12. Foot Traffic Levels

    The amount of foot traffic your carpets endure affects how quickly they become dirty.

  13. High Traffic: Large families, frequent visitors, or home-based businesses increase dirt buildup.
  14. Children at Home: Kids are more likely to spill, track in dirt, and cause wear.
  15. Suggested Cleaning Schedule:
  16. High Traffic Areas: Every 6 months.
  17. Moderate Traffic: Every 9 to 12 months.
  18. Low Traffic: Every 12 to 18 months.
  19. Indoor Smoking

    Smoking indoors leads to the buildup of smoke residues and odors in carpets.

  20. Smoke Particles: These settle into carpet fibers, impacting air quality and causing discoloration.
  21. Suggested Cleaning Schedule:
  22. Indoor Smokers: Every 6 months.
  23. Warranty Requirements

    Some carpet warranties require professional cleaning at specific intervals to remain valid.

  24. Manufacturer’s Guidelines: Not adhering to these can void your warranty.
  25. Suggested Cleaning Schedule:
  26. As Per Warranty Terms: Typically every 12 to 18 months.

Benefits of Regular Professional Carpet Cleaning

  1. Enhanced Air Quality: Removes pollutants and allergens trapped in the carpet.
  2. Extended Carpet Lifespan: Regular maintenance prevents premature wear.
  3. Improved Appearance: Keeps carpets looking fresh and vibrant.
  4. Odor Removal: Tackles smells from pets, spills, and smoke.
  5. Healthier Home Environment: Reduces the risk of mold and bacterial growth.

Maintaining Carpets Between Professional Cleanings

  1. Frequent Vacuuming: At least once a week, more often in high-traffic areas.
  2. Immediate Spill Management: Blot spills promptly to prevent stains.
  3. Use of Doormats and Rugs: Minimizes the amount of dirt entering your home.
  4. Implement a No-Shoes Policy: Reduces dirt and wear by leaving shoes at the door.
  5. Regular Pet Grooming: Decreases shedding.

The frequency of professional carpet cleaning depends on your household’s unique factors. By considering the presence of pets, allergy sufferers, foot traffic, and other specific conditions, you can establish a cleaning schedule that maintains your carpets’ appearance and promotes a healthier living environment. Regular professional carpet cleaning is an investment in your home’s longevity and your family’s well-being.

Foundation repair Near Northbrook

The foundation of your home plays a pivotal role in maintaining its stability and longevity. Over time, various elements such as shifting soil, changes in moisture levels, and general wear and tear can undermine your foundation, potentially leading to significant repair costs if not addressed timely. If you’re experiencing foundation issues, having a clear understanding of the foundation repair process can help you navigate the project with ease. Here’s an in-depth guide on what to expect from the beginning to the end of a typical foundation repair Near Northbrook project.

1. Initial Inspection and EvaluationSpotting the Issue

The foundation repair process starts with a comprehensive inspection by a qualified foundation contractor. During this stage, the contractor will:

  1. Look for Visible Signs: Inspect for cracks in walls, uneven flooring, doors that don’t close properly, and gaps around windows.
  2. Evaluate Structural Health: Utilize specialized tools and techniques to determine the extent of the damage and identify the root causes, such as soil movement, poor drainage, or previous construction errors.

Reporting Findings

After the inspection, the contractor will present a detailed report outlining their findings, the severity of the issues, and the proposed foundation repair solutions. This report is essential for planning the repair strategy.

2. Developing a Repair Plan and ProposalCustomized Repair Strategy

Based on the inspection results, the contractor will formulate a personalized repair plan, which typically includes:

  1. Repair Techniques: Deciding whether to use underpinning, piering, slabjacking, or other foundation repair methods.
  2. Materials Required: Selecting appropriate materials tailored to your foundation type and the specific issues identified.
  3. Project Timeline: Estimating the duration of the foundation repair project, including key milestones and expected completion dates.

Cost Estimation

A comprehensive cost estimate will accompany the repair plan, detailing expenses for labor, materials, permits, and any additional services. It’s important to review this proposal carefully and discuss any questions or concerns with your contractor before moving forward.

3. Securing Necessary Permits and ApprovalsCompliance with Building Codes

Foundation repair projects often require permits from local building authorities to ensure that the work adheres to safety and building standards. Typically, your contractor will handle the permit application process, but it’s advisable to confirm that all necessary approvals are obtained before work commences.

Informing Neighbors

In cases of extensive foundation repair, you might need to notify your neighbors about the upcoming work. This helps prevent misunderstandings and ensures a smoother project progression.

4. Preparing for the Repair WorkSite Preparation

Before initiating the foundation repair, the worksite must be prepared to ensure safety and accessibility. This involves:

  1. Protecting Interior Areas: Covering floors, walls, and furniture to shield them from dust and debris.
  2. Securing the Repair Zone: Installing barriers or signage to restrict unauthorized access to the work area.
  3. Setting Up Equipment: Bringing in necessary machinery and tools required for the foundation repair process.

Managing External Factors

Ensuring proper drainage around your home, repairing gutters, and managing vegetation can prevent future foundation issues and support the foundation repair efforts.

5. Carrying Out the Foundation RepairExecuting Repair Methods

Depending on the specific issues identified, the contractor will apply appropriate foundation repair techniques such as:

  1. Underpinning: Reinforcing the foundation by extending it to a more stable soil layer.
  2. Piering: Installing steel or concrete piers to lift and stabilize the foundation.
  3. Slabjacking: Injecting grout beneath the slab to raise and level it.
  4. Crack Sealing: Filling and sealing cracks to prevent water intrusion and further damage.

Continuous Oversight

Throughout the foundation repair process, the contractor will monitor progress to ensure that each step is executed correctly and that the foundation is stabilizing as intended.

6. Final Inspection and Quality ControlConcluding Assessment

Once the foundation repairs are complete, a final inspection is conducted to verify that all issues have been effectively addressed. This includes:

  1. Structural Integrity: Ensuring the foundation is secure and level.
  2. Aesthetic Quality: Checking the repair work for any visible imperfections or incomplete areas.
  3. Operational Functionality: Confirming that doors, windows, and floors operate smoothly without sticking or unevenness.

Quality Assurance Measures

Reputable foundation repair contractors typically offer warranties or guarantees for their work, providing assurance that the repairs will hold up over time. It’s important to understand the terms of these warranties and any required maintenance to maintain your foundation’s integrity.

7. Cleanup and RestorationDebris Removal

After the foundation repair, the worksite is thoroughly cleaned, removing any leftover materials, tools, and debris to restore your property to its pre-repair condition.

Restoring Surfaces

Any interior or exterior surfaces that were protected or altered during the repair process will be returned to their original state. This may involve repainting walls, reinstalling fixtures, or repairing landscaping.

8. Preventative Measures and Maintenance RecommendationsOngoing Maintenance

To prevent future foundation issues, consider implementing the following maintenance tips:

  1. Regular Inspections: Periodically examine your foundation for signs of damage or movement.
  2. Effective Drainage: Ensure that gutters and downspouts direct water away from your home’s foundation.
  3. Stable Moisture Levels: Maintain consistent moisture around your foundation by watering plants appropriately and managing landscaping.
  4. Prompt Crack Repairs: Address any minor cracks immediately to prevent them from expanding and causing significant damage.

Professional Consultations

Regularly consult with your foundation contractor to assess your foundation’s health and receive recommendations for maintaining its stability.


Having a clear understanding of the foundation repair process is essential for homeowners facing structural issues. From the initial inspection to the final cleanup, each step is crucial in ensuring a stable and secure foundation for your home. By partnering with experienced professionals and staying informed throughout the project, you can effectively manage foundation repairs and protect your investment for the future.

Landscaping Near Me Chicago | MRC Construction

Your Trusted Landscaping Experts Near Me in Chicago

Searching for reliable landscaping near me Chicago? Look no further than MRC Construction! We provide a full range of landscaping services to transform your outdoor space into a stunning oasis. Whether you need lawn care, garden design, or a complete landscape overhaul, our team is dedicated to delivering high-quality, custom solutions. With years of experience in the industry, MRC Construction is your go-to for exceptional landscaping near me Chicago. Contact us today to start your landscaping project!

Fence company near me Wheeling

A well-maintained fence enhances your property’s curb appeal, provides security, and ensures privacy. Each season presents unique challenges that can impact your fence’s condition and appearance. From the blistering heat of summer to the freezing cold of winter, proper care is necessary to keep your fence in optimal condition throughout the year. Here are some seasonal maintenance tips and tricks, along with advice on when to consult a fence company near me Wheeling .

Spring: Assess and Refresh

Damage Inspection

Spring is the ideal time to inspect your fence after the winter months. Look for:

  1. Loose or Missing Fasteners: Ensure all nails, screws, or bolts are secure.
  2. Signs of Rot or Decay: Especially for wooden fences, check for any deterioration or pest damage.
  3. Rust on Metal Fences: Identify and treat any rust spots to prevent spreading.
  4. Post Stability: Verify that fence posts are firmly anchored and haven’t been moved by frost heave.

Comprehensive Cleaning

  1. Debris Removal: Clear away leaves, branches, and other debris that may have accumulated.
  2. Fence Washing: Clean the fence surface with mild detergent and water. A pressure washer can be used but should be applied carefully to avoid damage.
  3. Mold and Mildew Treatment: Use a bleach and water solution to eliminate any mold or mildew, particularly on wooden fences.

Repainting or Restaining

  1. Wooden Fences: Apply a new coat of paint or stain to protect the wood from moisture and UV rays.
  2. Metal Fences: Touch up any chipped paint to prevent further rusting.

Summer: Protect Against Heat and Pests

Pest Monitoring

  1. Termites and Carpenter Ants: These pests thrive in warmer weather. Consider applying a pesticide or consulting a professional if you notice signs of infestation.
  2. Vegetation Management: Trim back any vines or plants that may trap moisture against the fence or cause structural stress.

Sealing and Protection

  1. UV Protection: Apply a sealant with UV inhibitors to prevent fading and cracking on wooden fences.
  2. Metal Fence Maintenance: Use rust-inhibiting paint to protect against oxidation caused by humidity.

Preventative Watering

  1. Maintain Moisture Levels: In extremely dry conditions, lightly watering your wooden fence can prevent the wood from drying out and cracking.

Fall: Prepare for Winter

Leaf and Branch Cleanup

  1. Remove Leaves: Wet leaves can adhere to your fence and promote mold growth.
  2. Trim Overhanging Branches: Prevent potential damage from branches that could break under snow weight.

Reinforce and Repair

  1. Secure Loose Posts: Ensure all fence posts are stable to withstand winter winds and snow.
  2. Check Hardware: Tighten any loose screws or brackets to maintain structural integrity.

Weatherproofing

  1. Apply Sealants: Use a waterproof sealant on wooden fences to guard against moisture absorption.
  2. Protect Metal Fences: Consider applying a protective wax or oil to prevent rust.

Winter: Prevent Damage from Snow and Ice

Snow and Ice Management

  1. Gently Remove Snow: Clear excess snow from your fence to reduce weight and moisture buildup.
  2. Avoid De-Icers: Chemicals can harm both wooden and metal fences. Use sand for traction near the fence instead.

Regular Inspections

  1. Check for Moisture Damage: Look for ice buildup that could cause cracks or splits in the fence material.
  2. Monitor Post Stability: Frost can cause ground movement, affecting fence posts.

Minimal Maintenance Efforts

  1. Avoid Major Repairs: Materials are more brittle in cold temperatures, so postpone significant repairs until warmer weather arrives.

Ongoing Maintenance Tips

Maintain a Clear Perimeter

  1. Manage Soil and Mulch: Keep these materials away from the fence base to prevent rot and rust.
  2. Check Irrigation Systems: Ensure sprinklers aren’t constantly wetting the fence, which can lead to moisture-related issues.

Professional Fence Company Inspections

  1. Seek Expert Advice: Periodically have a fence company inspect your fence to identify and address issues you might overlook.

Keep Maintenance Records

  1. Document Repairs: Maintain a log of all maintenance activities and repairs. This can be useful for warranty claims or when selling your property.

When to Engage a Fence Company

While routine maintenance can handle many minor issues, certain situations require professional expertise:

  1. Significant Structural Damage: Severe leaning, broken posts, or extensive rot need expert intervention.
  2. Complex Repairs: Issues with electric gates or intricate metalwork are best handled by professionals.
  3. Persistent Pest Problems: Ongoing infestations that DIY methods can’t resolve should be addressed by a fence company.

Consistent seasonal maintenance is essential for prolonging your fence’s lifespan and keeping it attractive and functional. By following these tips and addressing problems promptly, you’ll save money and ensure your fence remains a valuable part of your property all year long. When in doubt or facing major repairs, don’t hesitate to contact a reputable fence company for professional assistance.

Window Replacement Near Me Madison | Real Exteriors

Revitalize Your Home’s Appearance with New Windows
Are you ready to transform your home? A window replacement near me Madison can elevate your home’s aesthetic appeal. New windows can change the entire look of your property, making it more inviting and modern. At Real Exteriors, we offer a variety of window styles and finishes to match your unique taste and enhance your home’s curb appeal.
Our experienced team specializes in window replacement near me Madison, ensuring that you receive quality service from start to finish. We understand that choosing the right windows can be overwhelming, but we’re here to guide you through the process, helping you select the best options for your home.
Don’t wait any longer to give your home the facelift it deserves! Contact us today for a consultation and discover how our window replacement services can make a significant impact on your property’s appearance.

Bathroom remodeling near me in Bollingbrook


Undertaking a bathroom remodeling near me in Bollingbrook project is an exciting way to refresh a key area of your home. A crucial part of this transformation is choosing the perfect color scheme, which influences the mood and ensures your bathroom complements your home’s décor. Here’s how to select colors that set the right tone and harmonize with your interior design.

Decide on the Desired Atmosphere

Consider the feeling you want your bathroom to evoke:

  1. Serene Space: Soft blues, greens, and neutrals for a calming effect.
  2. Energizing Area: Bright whites, yellows, or bold colors for vibrancy.
  3. Luxurious Look: Rich jewel tones for sophistication.

Evaluate Size and Lighting

Color perception changes with space and light:

  1. Smaller Rooms: Light colors expand the space visually.
  2. Larger Rooms: Dark colors add warmth and intimacy.
  3. Lighting Variations: Test colors in different lighting to see true effects.

Align with Home Décor

Ensure your bathroom fits your home’s style:

  1. Complementary Colors: Match colors with adjacent rooms.
  2. Style Match: Keep the bathroom’s design consistent with your home.

Explore Color Schemes

Use color theory to guide you:

  1. Monochromatic: Shades of one color for unity.
  2. Analogous: Neighboring colors for harmony.
  3. Complementary: Opposing colors for contrast.

Integrate Fixtures and Materials

Coordinate with fixtures:

  1. Tiles and Flooring: Align with wall colors.
  2. Cabinets and Counters: Harmonize with your palette.
  3. Hardware Finishes: Influence overall color dynamics.

Test Before Finalizing

Before deciding:

  1. Paint Samples: Observe colors at different times.
  2. Material Samples: Ensure compatibility.

Personalize with Accessories

Add individuality:

  1. Decor Items: Use accents to introduce colors.
  2. Textiles: Towels and rugs add texture.

Balance Trends with Timelessness

Stay current yet classic:

  1. Enduring Choices: Timeless colors for main elements.
  2. Trendy Accents: Update accessories easily.

Choosing the right color scheme for your bathroom remodeling project blends aesthetics with personal flair. By considering mood, space, and style, you create a harmonious and beautiful bathroom. Happy remodeling!

Sheet Metal Fabrication Near Me New Rochelle | CW Metals Inc.

The Power of Precision: Sheet Metal Fabrication Near Me in New Rochelle
For projects that require precision, expertise, and innovation, sheet metal fabrication near me New Rochelle offers solutions that go beyond expectations. At CW Metals Inc., we specialize in transforming raw metal into highly functional, aesthetically pleasing components for both residential and commercial applications.
From complex custom designs to high-volume production, our sheet metal fabrication near me New Rochelle ensures every detail is executed to perfection. Whether you’re an architect, contractor, or business owner, we provide the metal fabrication services you need to bring your ideas to life with efficiency and excellence.
For exceptional sheet metal fabrication near me New Rochelle, CW Metals Inc. delivers results that reflect your vision and our dedication to quality.

Cabinet refinishing near me in Elmhurst

quartz countertops near me Waukegan


Choosing the ideal color for your kitchen cabinets is a crucial decision that can dramatically influence the overall aesthetic and ambiance of your kitchen. Whether your goal is to achieve a contemporary, cozy, or unique look, the color of your cabinets is fundamental in establishing the desired atmosphere. This comprehensive guide provides actionable tips on selecting colors that not only enhance your kitchen’s décor but also help create the atmosphere you envision through cabinet refinishing near me in Elmhurst.

1. Evaluate Your Kitchen’s Existing Features

Before exploring color options, take inventory of your kitchen’s current elements:

  1. Walls and Backsplash: The hues and patterns of your walls and backsplash will guide your cabinet color selections.
  2. Flooring: The type and color of your flooring set the groundwork for your color scheme.
  3. Countertops: Whether your countertops are granite, quartz, or laminate, their color and texture are important considerations.
  4. Appliances and Fixtures: Stainless steel appliances offer flexibility, while colored appliances can act as focal points.

Understanding these components ensures that your cabinet refinishing project results in a harmonious blend with the rest of your space.

2. Define the Desired Mood

Different colors can evoke various emotions and settings:

  1. Warm Tones (Red, Orange, Yellow): Create an energetic and lively environment, perfect for kitchens where you entertain guests.
  2. Cool Tones (Blue, Green, Gray): Promote a calm and peaceful atmosphere, ideal for a relaxed kitchen space.
  3. Neutral Tones (White, Beige, Taupe): Provide versatility and timelessness, making the area feel more spacious and open.

Consider the mood you want your kitchen to reflect when choosing your cabinet refinishing colors.

3. Investigate Current Cabinet Color Trends

Staying updated with current trends can inspire your selection:

  1. Classic White: Always in style, white cabinets brighten the room and suit any design.
  2. Bold Navy Blue: Introduces depth and elegance, especially when paired with metallic hardware.
  3. Soft Gray: A contemporary neutral that complements various color schemes and materials.
  4. Two-Tone Cabinets: Mixing different colors for upper and lower cabinets adds visual appeal and depth.
  5. Natural Wood Finishes: Introduce warmth and texture, perfect for rustic or farmhouse-style kitchens.

Choose a trend that matches your personal taste and kitchen design through cabinet refinishing.

4. Factor in Kitchen Size and Lighting

The size and lighting of your kitchen can affect how colors appear:

  1. Small Kitchens: Light shades like white, pale gray, or soft pastels can make the space seem larger and more open.
  2. Large Kitchens: Darker colors like charcoal, navy, or forest green can add coziness and sophistication.
  3. Natural Lighting: Kitchens with plenty of natural light can accommodate darker or more vibrant colors without feeling cramped.
  4. Artificial Lighting: Warm LED lighting enhances warm tones, while cooler lighting complements blues and grays.

Evaluate your kitchen’s size and lighting to select a color through cabinet refinishing that enhances the space.

5. Ensure Harmony with Existing Decor

Your kitchen should blend seamlessly with adjacent rooms:

  1. Consistent Color Palette: Use colors that complement those in nearby areas for a unified look.
  2. Accent Colors: If nearby rooms feature bold colors, neutral cabinet colors can balance the palette, and vice versa.
  3. Style Consistency: Ensure the cabinet color matches the overall style of your home, whether it’s modern, traditional, or eclectic.

Creating harmony throughout your home enhances both aesthetic appeal and cohesion through cabinet refinishing.

6. Test Colors Before Making a Final Decision

Colors can vary under different lighting and with various materials:

  1. Sample Boards: Paint sample boards and place them in your kitchen to observe how they look throughout the day.
  2. Hardware Samples: Consider how the color of your cabinet hardware interacts with your chosen cabinet color.
  3. Virtual Mockups: Utilize virtual tools offered by some retailers to visualize different color combinations in your kitchen.

Testing colors helps prevent costly mistakes and ensures satisfaction with your cabinet refinishing choice.

7. Consider Long-Term Appeal

While trendy colors can be appealing, think about the longevity of your cabinet color:

  1. Timeless Shades: Neutral and classic colors tend to stay stylish over the years.
  2. Maintenance: Light colors may show stains and wear more easily, whereas darker colors can conceal imperfections.
  3. Resale Value: If you plan to sell your home, opt for colors that have broad appeal and are unlikely to turn off potential buyers.

Balancing personal taste with long-term practicality ensures lasting satisfaction with your cabinet refinishing project.

8. Consult Professionals for Expert Guidance

When unsure, seeking professional advice can be invaluable:

  1. Interior Designers: They provide expert recommendations tailored to your space and preferences.
  2. Color Consultants: Specialists who assist in choosing colors that complement your existing décor and desired atmosphere.
  3. Kitchen Remodelers: Professionals who understand the latest trends and practical aspects of kitchen design.

Professional guidance can simplify the decision-making process and enhance the final results of your cabinet refinishing.

Selecting the right color for your kitchen cabinets involves a combination of personal preference, aesthetic considerations, and practical factors. By evaluating your kitchen’s existing elements, defining the desired atmosphere, exploring trends, and testing colors, you can make an informed decision that elevates your kitchen’s style and functionality through cabinet refinishing. Whether you choose timeless white, bold navy, or soft gray, the perfect cabinet color awaits to transform your kitchen into a space you love.

Masonry contractors near me in Palatine


Masonry has been a cornerstone of construction for centuries, and its relevance in energy-efficient building designs remains unmatched. Masonry contractors near me in Palatine today leverage traditional techniques alongside modern innovations to create buildings that are both beautiful and energy-efficient. The dense structure of masonry materials provides excellent thermal mass, which helps stabilize indoor temperatures and reduce the need for mechanical heating and cooling. Additionally, masonry’s durability ensures that buildings maintain their energy efficiency over time, requiring fewer repairs and renovations. Embrace the timeless benefits of masonry by working with skilled masonry contractors to design and build energy-efficient spaces that last.